CARE AND MAINTENANCE
First-time prep
HOW TO SEASON YOUR SOAPSTONE COOKWARE
Before you cook your first meal, your soapstone needs a quick, one-time seasoning. Think of it like breaking in a classic cast-iron skillet—it prepares the stone for the heat and locks in its long-term durability. The best part? You only have to do this once.
Follow these simple steps based on the type of cookware you have:
FOR POTS & PANS (STOVETOP METHOD)
- Oil it down: Using a brush or paper towel, rub a layer of vegetable oil over the entire surface of the pan and its lid—inside and out.
- Let it rest: Let the oiled cookware sit overnight so the stone can thoroughly absorb it.
- Simmer: The next day, fill the pot with water, put the lid on, and place it on your stove. Turn the burner to its lowest heat setting and let it simmer gently for about two hours.
- Cool and wash: Remove the pan from the heat and let it cool completely to room temperature on its own. Give it a gentle wash to wipe away any leftover surface oil, and you’re ready to cook!
FOR GRILLS & PIZZA STONES (OVEN METHOD)
- Coat the stone: Rub both sides of the grill or pizza pan with a generous layer of vegetable oil.
- Bake it: Place it in the oven and bake at 356°F (180°C) for 40 minutes. Crucial note: Do not exceed this temperature during the seasoning process.
- Cool and wash: Allow the stone to cool down naturally to room temperature inside the oven, then wash away the excess oil.
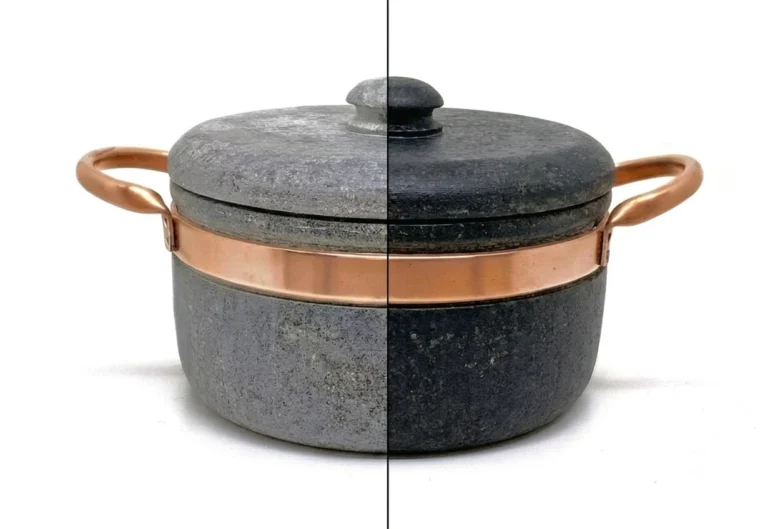
WHAT TO EXPECT: A BEAUTIFUL TRANSFORMATION
The Color Shift: Once seasoned, your soapstone will naturally transform from its original light gray to a stunning, deep charcoal black. This process actually highlights the beautiful, unique patterns inherent in the stone.
- Want a deeper shade? If you prefer an even richer hue, you can grease the cookware with a little more oil after the initial treatment.
- Living character: Daily cooking and contact with fats will naturally continue to darken and enrich the stone over time.
- Prefer the original gray? If you love the look of the original light gray finish and want to keep it that way, simply buff the stone gently with fine-grit sandpaper after use.
Care and Maintenance
Getting the most out of your soapstone cookware comes down to a few simple habits. While seasoning the stone prepares it for its first time over the flame, continuous proper care is the real secret to keeping it in perfect condition for years to come.
THE GOLDEN RULE: AVOID THERMAL SHOCK
Soapstone is incredibly durable, but drastic, sudden temperature shifts can cause it to crack. To protect your cookware, keep these simple rules in mind:
Warm it up slowly: Always heat the pan gradually over a low flame.
Let it cool completely: Allow the pan to cool to room temperature before washing. Never plunge a hot pan into cold water.
Watch where you rest it: Never place a piping-hot pan directly onto a cold countertop or surface.
Hold the fry: Do not use the pan for frying during its first few uses. Give it a chance to break in first.
CLEANING & DISHWASHING
Everyday washing: Soapstone is versatile and can be washed easily by hand or tossed right into the dishwasher.
Stuck-on food: While soapstone boasts natural non-stick properties, it’s not synthetic Teflon. If food happens to stick to the bottom, just let it soak in water for 10 minutes and it will wipe right off.
UTENSILS & SURFACE CARE
Ditch the metal: Avoid using sharp metal utensils to mix or serve food, as they can scratch the surface. Stick to wood, plastic, or silicone spoons instead.
Fixing scratches: If the stone gets scratched—or if you want to restore its natural, original gray color—simply buff the area gently with fine-grit sandpaper.
HOW TO CLEAN COPPER HANDLES
Copper tarnishes naturally over time, but you can easily bring back its brilliant shine using a quick DIY paste made from pantry staples.
Make the paste: Mix salt and vinegar together, adding just enough vinegar to the salt until you get a thick, workable paste.
Rub it in: Dip a soft cloth into the paste and rub the copper handles until the oxidation and stains disappear.
Tackle tough spots: Use steel wool for stubborn discoloration, and a toothbrush to get into those hard-to-reach crevices.
Rinse and dry: Rinse the handles thoroughly, then dry them completely with a soft cloth. Banishing all moisture is the best way to prevent new stains from forming.